One of the main problems I’ve met when I bought my iPhone is that I can’t listen to the music I love freely without needing to go through many ways and different roads. As most of you know as an iPhone user you can’t transfer or receive a ringtone you have listened on your friend’s phone, why ? Because iPhone bluetooth is only made for other Apple devices only, and that’s the biggest thing I hate in Apple.
But that’s doesn’t mean you will never listen to beautiful ringtones or etc… Using iTunes you can convert any song or audio clip in your iTunes library into a ringtone with a few simple steps. We’ve got a step-by-step tutorial to show you how to create awesome ringtones that will make you the envy of the party…
All what you have to do right now is following my simple steps after the jump:
STEP 1: Simply launch iTunes from your computer’s desktop.
STEP 2: Now pick your song or audio file you want to use from your iTunes library.
STEP 3: Right click on the song and select “Get Info”
In the Get Info window, selection the Options tab and change the Stop and Start Time to read the segment of the song that you want to save as a ringtone. The ringtone length cannot exceed 30 seconds. If you want to start at the beginning of the song, set the start time to 0:00 and the end time to the number of seconds you want the ringtone to be. If you want to start at the chorus of a song, play it first to determine what time the chorus starts and then use that number as the Start Time, and no more than 30 seconds after that as the Stop Time. For example, Start Time – 2:15, Stop Time – 2:45. When you have entered the Start and Stop Time, click OK.
STEP 4: Now right click on the song again and select—> “Create Apple lossless Audio File”
iTunes will take the segment you have just selected from the song in Step 3 and use it to create the new file. A second song with the same name but new length should appear right next to the original in iTunes.
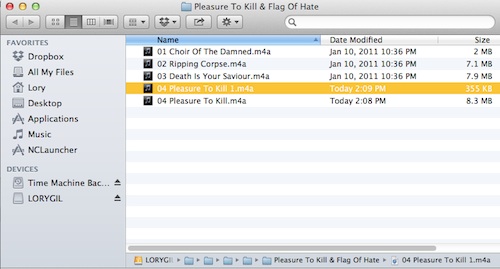
STEP 5: Now the new song file will appear, so right click on it and select “Show In Finder” and if you are a Windows user select “Show in Windows Explorer”
The new song will show up in your Finder window as an .m4a file. Select it.
STEP 6: Rename the extension of the file from .m4a to .m4r. Make sure you rename the extension, not the file. This step is very important. Changing it to .m4r turns the file into a ringtone.
STEP 7: Now go back to iTunes and delete the newly created short song.
NOTE: When asked whether you want to move the selected song to the Trash or keep it in iTunes, select “Keep File.†This step is also important. If you do not remove this song, the ringtone will not save to iTunes properly.
STEP 8: Go back to Finder (or Windows Explorer) and double click on the .m4r file. The ringtone will automatically move to your iTune’s Tone library.
STEP 9: Now connect your iPhone to iTunes.
STEP 10: From there select the “Tones” tab from the iPhone selection.
Under the Tones section, select “Sync All Tones†and then click on the “Sync†button at the bottom of the iTunes screen.
When your iPhone is done syncing, the new ringtones can be found in your Settings app on your device.
Go to Settings> Sounds> Ringtone and select your new clip. These clips can also be used as text message tones, so you can really let your creativity shine.
So what do you think about this tip ? If you are finding it useful please consider it sharing with your friends…


