If you’ve installed iOS 10 and prefer iOS 9, whether it’s to jailbreak or you just prefer it, you’re in luck. You can easily rollback/downgrade, however hurry as this window of opportunity won’t last forever.
Step 1Â – Backup
If you ever want to come back to iOS 10, or something goes wrong, you’ll thank yourself for having everything saved. I recommend iCloud simply for convenience. However, backing up to iTunes comes with the added advantage that you can archive it, however beware as backups aren’t so easily encrypted with iOS 10. Read here to find out more.
To carry out an iTunes backup, carry out the following steps.
- Plug in your iPhone, iPod or iPad into your PC (USB only, no wireless syncing) and open iTunes.
- Click the device icon, then select iTunes backup.
- Click Backup now and watch the progress bar at the top.
- Wait for said backup to finish.
- Go to iTunes > Preferences > Devices (Mac) OR Edit -> Preferences -> Devices (Windows) and look for the backup you just completed.
- Hold the Ctrl key (Mac) and click on the backup, or Right Click for Windows. In the context menu, select the option Archive.
Step 2 – Download iOS 9
I personally recommend a website called http://www.felixbruns.de, simply because it downloads from the official Apple website and offers a really great interface. You can also download IPSW files from iJailbreak’s download section.
Find the iPSW for your device, and download the latest iOS 9. The other’s have stopped being signed by Apple so you won’t be able to install them unfortunately.
Download it to your desktop, or somewhere else you can easily find.
Step 3
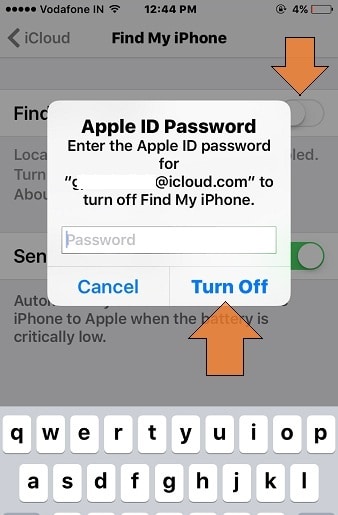
While it’s downloading, take this opportunity to turn off ‘Find my iPhone’. Unless your iPhone is in DFU mode then it will need turning off before you restore otherwise iTunes won’t let you restore. If you are in DFU mode then don’t worry, iTunes can’t tell.

Step 4
Once the download is complete, go into iTunes and instead of simply clicking the Restore button, hold down either Option & Command on a Mac, or hold down the Shift key on Windows, then click ‘Restore’
This will bring up a Finder window (Mac) or a Windows Explorer (Windows) window. Simply navigate to wherever you saved it (this is where keeping it somewhere memorable is useful!)
Select it, then click OK or double click, or press enter, or whatever else you normally do to select a file.
Step 5
iTunes will now verify the integrity of the file and begin the restore. Just leave your device plugged in with a good cable and come back in 10-20 minutes and it will all be done.
I recommend, especially on Windows, leaving your computer just to restore your iDevice, as iTunes is hardly the most reliable program and you don’t want it bricking your device.
You’re now finished
If iTunes gives you any errors then Google them or leave a comment down below and the community will help you solve them.
As always, leave a comment below if you found this guide useful and are you going to stick with iOS 10? Or rollback to something a little more traditional?
The post How To Downgrade From iOS 10 To iOS 9 appeared first on iJailbreak | Jailbreak And iOS News.


