Want to transfer your photos, videos, or other files from your Mac to iPhone or iPad, or from iPhone or iPad to your Mac? You have comes to the right place. In this guide, we will show you how you can easily and quickly share files between iPhone/iPad and Mac using AirDrop feature.
Using AirDrop feature available on most of the Mac and iOS devices, you can send files from Mac to Mac, iPhone/iPad to Mac, Mac to iPhone/iPad, and iPhone to iPad and vice versa. Here we will show you how to share files using AirDrop and what to do if you encounter any issue.
If you want to AirDrop files between iPhone and iPad, please check out our dedicated guide which shows you exactly that:
Table of Content
- AirDrop Supported Mac, iPhone, and iPad Models
- Turn AirDrop On an iPhone or iPad
- Turn AirDrop On on a Mac
- How to Transfer Files Between iPhone/iPad and Mac
- How to Transfer files from a Mac to Another Mac
- Fix: Cannot see Mac in AirDrop?
- Fix: Cannot see iPhone or iPad in AirDrop?
AirDrop Supported Mac, iPhone, and iPad Models
Not all iPhone, iPad, Mac, and iPod Touch models support AirDrop feature. Apparently, the following Apple devices support AirDrop:
- iPad Pro or newer
- iPad mini or newer
- iPad 4 or newer
- iPhone 5 or later
- MacBook Pro (Late 2008) or later, excluding the MacBook Pro (17-inch, Late 2008)
- MacBook Air (Late 2010) or later
- MacBook (Late 2008) or later, excluding the white MacBook (Late 2008)
- iMac (Early 2009) or later
- Mac Mini (Mid 2010) or later
- Mac Pro (Early 2009 with AirPort Extreme card, or Mid 2010)
Turn AirDrop On an iPhone or iPad
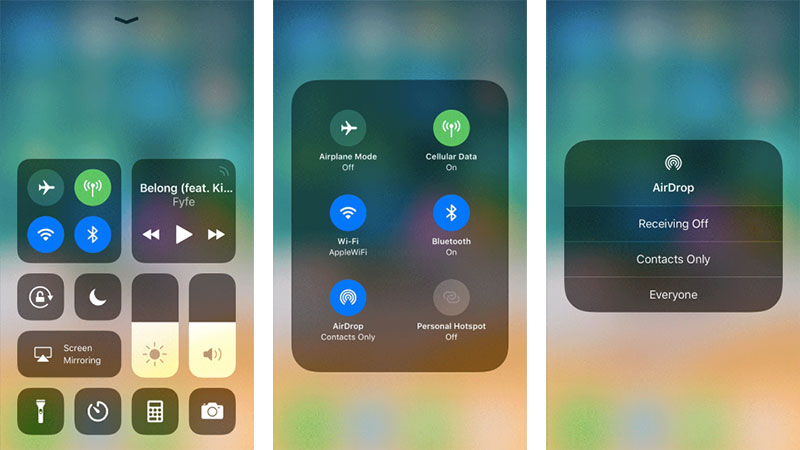
- First of all turn on the Wi-Fi or Bluetooth on your iPhone or iPad.
- Here are the steps to set up and turn on AirDrop on an iPhone or iPad:
- Launch the Control Center:
iPhone 8 or older: swipe up from the bottom.
iPhone X: swipe down from the top-right corner of the screen. - On an iPhone 6s or newer model, press firmly (Press and hold on an iPad or older iPhone models) on the wireless control box on the upper left side of the Control Center.
- Tap on AirDrop.
- Choose who can send files to you using Airdrop. You can choose between Receiving Off, Contacts Only*, or Everyone.
*If you choose Contact Only, make sure you are logged into iCloud and the targeted person is on your contacts list.
- Launch the Control Center:
Turn AirDrop On on a Mac
In older versions of macOS, it was required to enable Airdrop by opening the Finder but is newer macOS this is no longer necessary. Just make sure the Wi-Fi is turned on on your Mac:
- The Wi-Fi icon appears in the top menu towards the top-right corner of the screen. The Wi-Fi is turned on if the curved Wi-Fi icon is black.
- If the icon is not black, click on the Wi-Fi icon and choose Turn Wi-Fi On.
Alternatively, Open System Preferences >Â Network and check that Wi-Fi is connected. If it’s is not connected, click the Wi-Fi tab and choose turn Wi-Fi On.
All files sent to a Mac using AirDrop land in the Downloads folder, unlike on the iPhone or iPad where they would automatically appear in the relevant app. For this reason, you may still want to move photos sent this way to Photos and so on.
How to Transfer Files Between iPhone/iPad and Mac
If you want to send photos, files or videos from an iPhone or an iPad to a Mac, you need to follow these steps:
How to Send Files from an iPhone/iPad to Mac
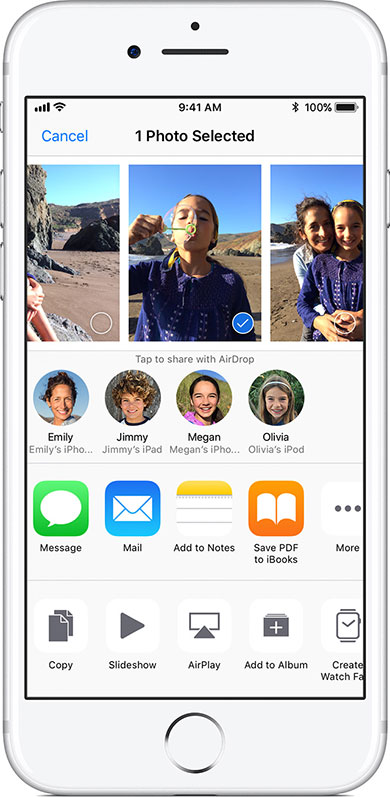
- Open the app from which you want to send something to your Mac, for instance, Photos app if you want to transfer photos or videos. If it is a contact that you want to send, open the Contacts app and find the relevant entry.
- Select the item that you want to transfer iPhone or iPad to Mac through AirDrop.
- Tap the share iconÂ
 (a box with an arrow pointing upwards, or sometimes just the word “Share”)
 - Tap the recipient icon that represents the Mac when it appears* (it may take some time to appear) in the AirDrop row. Your file will be shared with the selected recipient as long as they accept the file transfer. The transfer will be automatic without any need of Acceptance if you’re sending the file to your own Mac that is using the same Apple ID as that of sending device.
- You can send as many files as you like. Once the file is successfully transferred, you will the word “Sent” under the person’s device in the AirDrop row. The transferred files will appear in the Downloads of your Mac.
*You may see a picture of your contacts multiple times on AirDrop sheet. It is because your contact has multiple devices. However, you will see the device name as well which should make sure you pick the right one.
How to Receive AirDrop files on a Mac
Make sure the Wi-Fi is enabled on your Mac as shown in the steps of turning AirDrop on above.
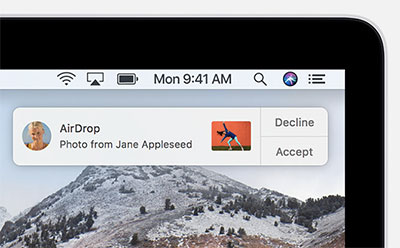
- When a file is shared with your Mac using AirDrop, you will see an alert on your Mac asking you for the approval.
Note: If you are sending a file from a device that is using the same Apple ID as you mac, you won’t see an approval alert for the transfer. - Approve the file transfer and the file will appear in your Downloads folder when the transfer is complete.
All the files received on a Mac using AirDrop appears in the Downloads folder, unlike on an iPhone or iPad where files appear in their relevant apps. After the transfer of Photos to your Mac, you may still want to move them to Photos app and so on.
How to Share Files from a Mac to an iPhone or iPad
Finder on the Mac now includes an AirDrop option. here is how you can send files from a mac to an iPhone or iPad using AirDrop:
- Make sure your Mac is connected to a Wi-Fi network.
- If you are sharing your internet from the Mac to an iPhone or iPad, you will have to stop it.
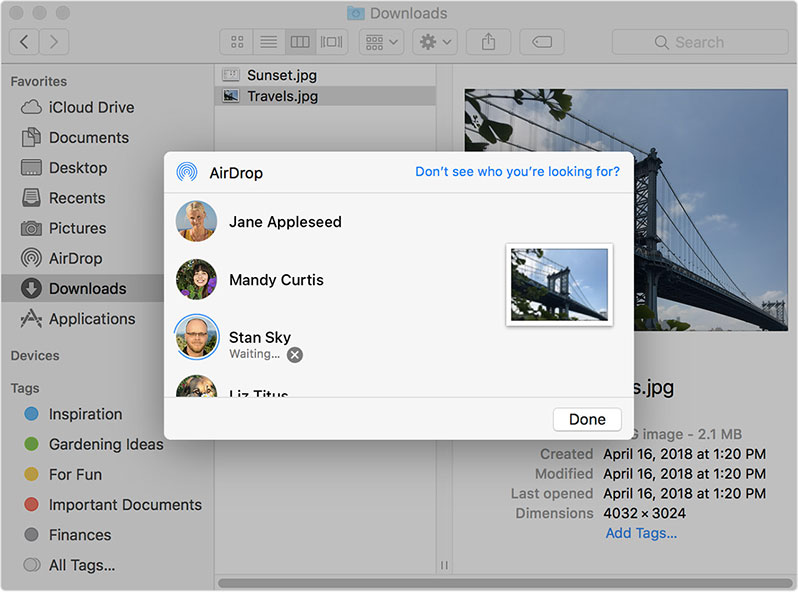
- Launch Finder on the Mac and select the AirDrop from the left navigation pane.
- Click Turn On Bluetooth if it already is not.
- Select either “Contacts Only” or “Everyone” from the drop-down menu that appears next to ‘Allow me to be discovered by’ at the bottom of the Finder window. This will make your Mac visible to other devices. To increase the chances of you Mac being seen by other devices and vice versa, we suggest you select “Everyone.”
- If your iPhone or iPad has an active AirDrop option and is not sleeping, it will appear under AirDrop window in the finder of your Mac.
- Simply drag and drop the files or images that you want to share onto the icon representing the targeted iPhone or iPad.
- A blue ring will appear and circle the icon of the receiving iPhone or iPad as the file is transferred.
- The word “Sent” will appear right below the device icon.

Alternatively, you can share files from a Mac using AirDrop right from an app by control-clicking it or by using Quick Look feature (click on file + press Spacebar). Here is how to:
- Look for the Share iconÂ
 (a box with an arrow pointing upwards, or sometimes just the word “Share”)
- Towards top-right on Quick Look Preview, Safari page or Photos app.
- In the preview, you will see it on the left.
If you do not see the share icon, it’s likely there will be an option to “Share” or “Collaborate”.
- Click the Share icon, Share, or Collaborate.
- Choose AirDrop from the list that appears.
- A screen listing the available devices should appear. Click the target device and wait for the file to transfer.
How to Receive AirDrop files on iPhone or iPad
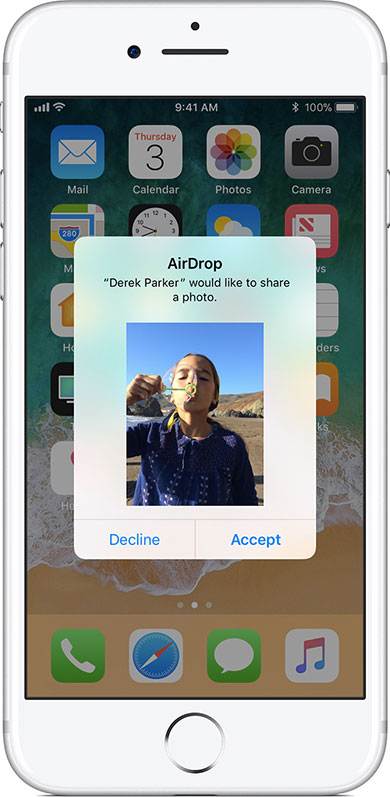
- When a friend shares a file, photo, or video with you through AirDrop, you will see an alert on your devices asking if you want to Accept or Decline the transfer.
- Tap Accept to begin the transfer of the shared file, photo, or the video.
Note: If you are Airdropping files between your own devices, you won’t see an alert to Accept or Decline, as long as you are signed into the same Apple ID on both devices. - The received content will appear in the relevant app – contact in Contacts app, photos in the Photos app, locations in the Maps app, etc.
How to Transfer files from a Mac to Another Mac
If you want to share files between two Macs using Airdrop, these are the steps you need to follow:
How to Send files between Macs using AirDrop
- Make sure both of your Macs are connected to the same Wi-Fi networks.
- If you are sharing your internet from the Mac to an iPhone or iPad, you will have to stop it.
- Rest of the steps are exactly similar to sending files from a Mac to an iPhone or iPad, as explained above.
How to Receive AirDrop files on a Mac
- Both the Wi-Fi and Bluetooth must be on and the Mac should be connected to the same Wi-Fi network as the sender Mac.
- When a file is received on a Mac, a popup appears to inform you that a file is being shared.
- Click Save to accept the transfer (or click Decline if you don’t want to accept it.)

Fix: Cannot see Mac in AirDrop?
There are few possible reasons due to which the Mac you are trying to send files through AirDrop does not appear for sharing:
Make sure both devices are connected to the same Wi-Fi network.
Turn the Bluetooth On.
Opening up the Finder and clicking on AirDrop is enough to ‘wake up’ AirDrop. Select “Everyone” from the drop-down menu that appears next to ‘Allow me to be discovered by’ at the bottom of the Finder window to make things easier during the file transfer.
Check that Internet Sharing isn’t turned on. (We explain how to check this, and how to turn it off below).
Turn off Internet sharing: The internet sharing is on if you see an upward arrow with the Wi-Fi icon on the top menu. If you are sharing the connection from the Mac to your iPhone or iPad, you will have to stop it in order for AirDrop to work without any issue. You can do it by going to System Preferences > Sharing and turn Internet Sharing off by deselecting the box beside that option.
Fix: Cannot see iPhone or iPad in AirDrop?
If the device or the person that you are trying to send files to is not appearing in your AirDrop, there are a few things that you should look into:
- Toggle Bluetooth/Wi-Fi On and Off.
- Check the Wi-Fi connection that your devices are connected to.
- Make sure both the Bluetooth and Wi-Fi are turned on.
Swipe up from the bottom on your iPhone or iPad to launch the Control Center and see if Wi-Fi and Bluetooth are turned on. Do the same on the other device. - Make sure AirDrop is not turned off or it is not set to only receive from a contact (and the person is not on your contacts list or vice versa):
Launch Control Center and press and hold on the area where you see network connectivity icons such as Airplane mode, WiFi, and Bluetooth. This will bring up AirDrop and Personal Hotspot options as well. Make sure AirDrop is turned ON. Turn Off Personal Hotspot if it is On.
If the AirDrop is already ON then tap the AirDrop icon and make sure it is set to Everyone (you can revert it back to Contacts when you’re done with the transfer.) Do the same on the other device. - Still not working? See if your and the target iPhone and iPad are capable of AirDrop (Check the compatibility list at the top.)
- If you have tried the above suspects, see if your software is up to date (Setting > General > Software.)
The post How to Transfer Files between Mac and iPhone/iPad using AirDrop appeared first on iPhoneHeat.


