Step 1: You aren’t going to be able to do anything, jailbroken or not, without the iFile .deb or .ipa file at hand. So with that in mind, you need to first download the necessary installable iFile app file from here.
Step 2: After the download is finished, you’ve got two ways to install iFile on your non-jailbroken iOS device, Either by using Xcode or Cydia impactor. Below we are going to show how to use these two methods:
Using xCode:
Step 1: Download and install the latest Xcode 7 beta release from here. The latest beta can be found in the downloads section of the dedicated Apple Developer Program portal.
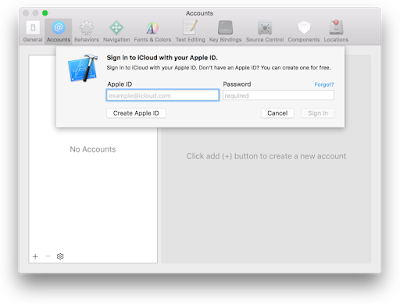
Step 2: Open Xcode and under the “Accounts tab” of the ‘Preferences’ menu select the ‘+’ button and choose ‘Add Apple ID…’ to add a new account. Log in with your Apple ID.
Step 3: Download and open up the Objective-C or Swift source code of the app that you wish to sideload onto your iOS device. For a start, you can download source code of GBA4iOS Game Boy emulator for sideloading on your iOS device by running the following command in Terminal:
sudo gem install cocoapods; git clone https://bitbucket.org/rileytestut/gba4ios.git; cd gba4ios; pod install
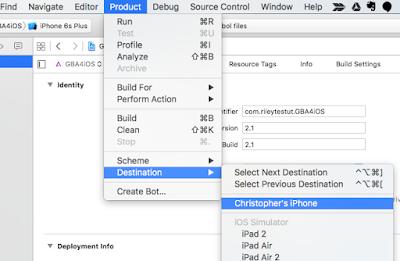
Step 4: Now once you have your desired app project open in Xcode, plug in your iOS device via USB and select it as the build destination. To do this, click on ‘Product’ from the Menu Bar then ‘Destination’ and select your connected device.
Step 5: Now Xcode needs a code signing signature in order to download iFile on your iOS device. Click on the project name on the left-hand side of Xcode. Add a unique ‘Bundle Identifier’ under the ‘Identity’ header. This usually takes a reverse domain name format but can actually be anything you wish.
Step 6: A warning message of “No matching provisioning profile found†will appear in that same window. Make sure your name is selected in the ‘Team’ box and then click on the ‘Fix Issue’ button underneath it and allow Xcode to, well, fix the issue.
Step 7: Provided everything is actually alright with the source code – there’s no compiler warnings or critical errors within – Xcode 7 beta should sideload the app and run it on the destination device.
That’s it! Now you should find iFile installed on your iPhone..
Now what?
Step 1: Now iFile should be installed on your device. you may ask yourself why it is not launching? Well, you need to actually trust the certificate first to allow the iOS system to invoke the app. To do this, launch Settings > General > Profiles & Device Management on the device. On some iOS versions, this option might be available at General > Profile(s) & Device Management or General > Device Management.
Step 2: Next, find the certificate relating to the recently installed iFile app, tap on it, and then tap Trust and Trust again.
Step 3: Once done, you should then be able to launch iFile app in the usual manner from the Home screen and get access to everything that the app is capable of doing on a non-jailbroken device.
NOTE: Installing iFile on a non-jailbroken iPhone will not give you the full experience on a non-jailbroken iOS device. This is because there’s no root access available, meaning the app is sandboxed and hence won’t have access to all of the folders and directories that it does on a fully jailbroken device. It will also have very limited ability to write files, and that too only in very specific folders.
Thanks RedmondPie


